For consistent and reliable testing, there are certain procedures that should be followed as good practice. The following suggestions are not necessary in order to run 3DMark06 but they will help to ensure that any analysis you make of the test results is more meaningful.
3DMark06 testing suggestions:
During all tests, 3DMark06 will instruct the graphics adapter drivers to disable Vsync. However, some driver revisions and older pieces of hardware will ignore such instructions. Futuremark therefore recommends that users make additional checks to guarantee that Vsync is disabled.
For professional level testing, the following suggestions will help to ensure a greater level of consistency:
Note: No benchmark results from 3DMark06 can be compared to those obtained from any previous version of 3DMark, as each one uses a completely different rendering system and test procedure to obtain the final results.
We have published the 3DMark06 Reviewer's Guide with more detailed information how to benchmark with 3DMark06 correctly. You can find it here.
During the lifetime of the 3DMark benchmark series, eager users and even professionals have skewed the 3DMark results, in order to increase the performance measurement of their systems or the hardware products they represent. These kinds of results may not be published or quoted without pointing out what kind of measures where used for increasing the results. There are a large number of known ways to obtain invalid results in 3DMark, but we will only list here a few widely used methods that produce results that are not comparable with default 3DMark results.
Requirements for a valid 3DMark06 default score:
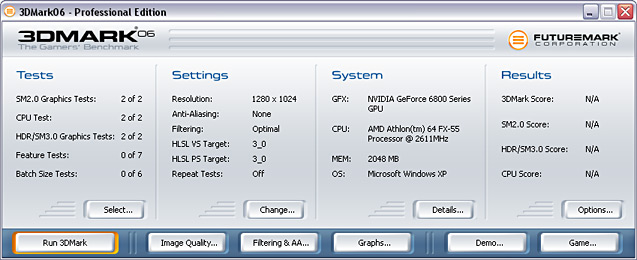
Upon loading 3DMark06, you will see this main window:
There are 4 sections in the window and 6 main buttons:
Sections:
Main buttons:
Note: All previous results are reset, when a new benchmark run is started. Also, no total scores are given if the benchmark run is interrupted.
Clicking the "Change " button in the Tests section opens the Select Tests dialog:
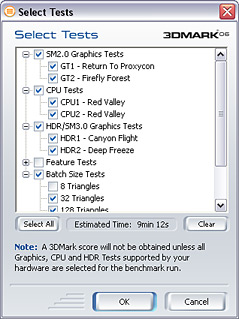
By default, all SM2.0 graphics tests, HDR/SM3.0 graphics tests (if supported by the hardware) and CPU tests are selected and each section is expanded to show the various benchmarks. By clicking on the checkboxes, you can choose which tests to run during the 3DMark06 benchmark. All available graphics tests and CPU tests must be selected and run, in order to get a 3DMark overall score. This means that graphics hardware capable of running the HDR/SM3.0 graphics tests using default settings, must run the tests in order to obtain the 3DMark overall score. Hardware limited to SM2.0 support will run the SM2.0 tests and the CPU tests, and the 3DMark overall score will be calculated based on those.
The test selection window also displays an estimated time as to how long it will take to complete all of the selected tests - it is an approximation due to the variable amount of time it may take to load the required data.
There are 4 buttons in this window:
See 'The Tests' section of this help file for more information regarding each specific benchmark test.
The Basic Edition of 3DMark06 does not allow custom selections of tests. The Basic Edition always runs all available graphics tests and CPU tests.
Clicking the "Change " button in the Settings section opens the Benchmark Settings dialog:
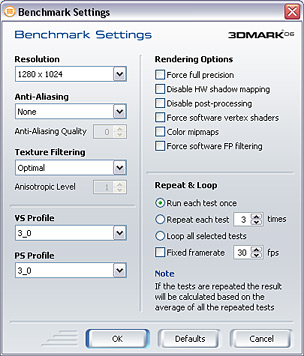
There are various controls in this window, which have a direct impact on the benchmark tests in 3DMark06:
Resolution
This drop-down menu allows you to select the frame resolution that all the tests
are rendered at. Choosing a setting higher than the default value of 1280 x
1024 may result in test scores lower than the default values.The ranges of resolutions available depend on what the graphics adapter and monitor both supports. 3DMark
uses 32 bit colors, with an 8-8-8-8 bit RGBA color palette in all tests.
Note: 3DMark06 uses 2048x2048 depth maps for dynamic shadow rendering. These are rendered for each frame and take up quite a bit of rendering power. These maps remain their original size even if the screen resolution is changed. 3DMark06 is therefore less sensitive to rendering resolution changes than the previous 3DMark versions.
Anti-Aliasing
This drop-down menu selects which level of Full Scene Anti-Aliasing (FSAA) to
use, provided the graphics adapter has support for FSAA via DirectX. Choosing
higher levels of anti-aliasing will produce a finer looking rendering, but the
test results will be lower. You can choose between non-maskable anti-aliasing
(super sampling), or anti-aliasing of certain sample counts, depending on what
your hardware supports. Usually, a higher sample count produces a finer but
slower rendering. If you choose non-maskable FSAA, 3DMark automatically uses
the lowest quality level. There is also an option to choose FSAA quality, which
is offered by some hardware and drivers. The meaning of these quality levels
varies a lot from one graphics card to another. Please read the documentation
of your graphics hardware to find out what these quality levels offer on your
hardware. Hardware with no or limited support for FSAA in the HDR/SM3.0 graphics tests will skip the tests if FSAA is enabled (or an unsupported level of FSAA is selected), and no 3DMark score will be calculated.
You can also switch off anti-aliasing, which is the default setting.
Texture Filtering Mode
This drop-down menu allows you to select what form of texture filtering is applied
in all tests. There are various options:
If you select anisotropic filtering, you can set the anisotropy amount below the Texture Filtering drop-menu. The default anisotropy level is 1. Some value lookup textures are not affected by filtering mode changes, since this would not change the rendering in any way.
The default setting for the texture filtering mode is Optimal.
HLSL Profile
The HLSL Profile drop-menu selects which HLSL profile to be used during the
benchmark run. DirectX offers different compilation targets, each optimized
for different hardware architectures. The HLSL shader code is the same for
all hardware, but the optimal compiler target is selected by default for each
graphics hardware type. The available compiler targets are:
By default, the best optimized compiler target is selected for each graphics hardware. If all new graphics hardware is used, which is not identified by 3DMark06, the compiler target will be selected according to a 'best guess' based on the DirectX Caps bits.
Note: PS2.x and VS3.0 and PS3.0 and VS2.x may not be mixed. When either profile is manually changed, the other will be automatically changed to match. PS3.0 and VS3.0 are required to be selected in order to run the HDR/SM3.0 graphics tests.
The Force full precision check box enables you to choose between partial (at least 16 bit) and full (at least 24 bit) floating point precision in shader calculations. By default partial precision is used where allowed in the shaders. Partial precision is allowed where it does not decrease the rendering quality. This setting forces full precision to be used in all shader calculations. Cards that only support a single shader calculation precision are not affected by this setting.
The Disable Hardware Shadow Mapping check box allows you to disable hardware shadow mapping usage in dynamic shadow rendering. HWSM is enabled by default on hardware supporting it. HWSM is an additional hardware feature that can be used to optimize dynamic shadow rendering. The resulting shadows are of the same quality as those produced by hardware without this support. This setting is implemented for professional reviewers that may want a more "apples to apples" comparison for some hardware reviews. The supported hardware shadow mapping formats are D24X8 (SM2.0 GT1 and SM2.0 GT2) and DF24 (SM2.0 GT1, SM2.0 GT2, HDR/SM3.0 GT1 and HDR/SM3.0 GT2).
The Disable post-processing checkbox disables full frame post-process effects in all graphics tests. The post-processing in the SM2.0 tests does bloom filtering that is done by rendering every frame to a texture and modifying the frame using a pixel shader. The bloom filter is a cinematic effect that makes bright surfaces appear over bright. The bright surface not only gets brighter discarding any details too small to be visible in the intense reflection, the light partly spills over darker areas in the frame surrounding the bright surface. The HDR/SM3.0 graphics tests use a much more advanced post-processing bloom effect, where the scene is rendered to a texture and progressively halved downscaled versions of that is generated (a bit like mip-maps). Each of these sub-frames are blurred using a Gaussian filter of the same pixel size. The final frame is then produced of a weighted sum of those downscaled and blurred frames. We are also using a star shaped glow effect that again uses the progressively halved frame copies for six separate line convolutions, one for each of the 6 streaks in the star. Each line is rendered in 3 passes. The first pass takes 5 samples of the image at the beginning of a line. The second pass takes again 5 samples from the output of the first pass, spaced five pixels apart. Finally the third pass takes yet again 5 samples from the output of the second pass, spaced 5*5=25 pixels apart. This simulates the six edge shutter of traditional cameras with exposure control. Also a ghost/lens reflection effect is being done. We paste copies of this new buffer on the screen, each scaled around the centre of the screen using suitable scaling factors.
In addition the above, the whole image is being processed by tone-mapping in order to get the correct light values for normal displays. Disabling the post-processing from the options disables all the effects mentioned above, and thus does not represent the way the scenes were designed.
In 3DMark06 the post-processing is always on by default.
The Force software vertex shaders check box controls whether vertex shading routines in the tests are processed by the graphics adapter or the CPU. Note that if the graphics adapter does not support hardware processing, all vertex shaders will be processed by the CPU anyway. Selecting Force software vertex shaders, if hardware accelerated is available, may result in some tests producing significantly lower results. On the other hand, running the default benchmark with forced software vertex shaders is an excellent way to test how well the CPU handles software vertex shaders. By default all vertex shaders are run in the graphics hardware if supported.
The Color mipmaps check box colors mipmaps red, green and blue. Mipmaps allow textures to be decreased in resolution if they are further away from the camera, thus saving GPU processing power and reducing annoying flickering of sub-pixel texels. Coloring mipmaps produces a somewhat distorted rendering, but it is a useful feature for inspecting texture filtering quality. The full size textures are not colored.
The Force software FP filtering check box controls whether the post-processing filtering is done in hardware (FP16 filtering) or in the shader (software FP filtering) in the HDR/SM3.0 graphics tests. Hardware with no support for 16 bit floating point filtering in the hardware will by default use software FP filtering in the HDR/SM3.0 graphics tests. This setting is implemented for professional reviewers that may want a more "apples to apples" comparison for some hardware reviews. By default all filtering is being done in the graphics hardware if supported.
There are additional benchmark settings on the right side of the dialog:
The Basic Edition of 3DMark06 can only run the benchmark using default settings
The default settings in 3DMark06 are as follows:
After every benchmark run, and when clicking the Options... button in the Result frame of the main window, the 3DMark06 Score dialog is displayed.

In the Advanced and Professional Editions the 3DMark total score of the latest benchmark run is displayed in large letters. This dialog also has a number of buttons for result handling:
You can view the frame rates of the separate graphics tests, CPU tests and the results of the theoretical tests with the Online ResultBrowser. You can also view the result details by clicking the Details button, but the ORB contains many other services with valuable information about your system, which cannot be obtained offline.

In the Basic Edition (Free) the 3DMark total score of the latest benchmark run is not displayed offline. You need to click on the "View Your Results Online" button in order to submit & view your results online. You will also get an analysis of your system's performance once the result has been submitted.
The 3DMark Score is calculated using the following formula:
SM2.0 Score = 120 x 0.5 x (SM2 GT1 fps + SM2 GT2 fps)
HDR/SM3.0 Score = 100 x 0.5 x (SM3 GT1 fps + SM3 GT2 fps)
CPU Score = 2500 x Sqrt( CPU1 fps x CPU2 fps)
We'll define for clarity:
GS for hardware capable of running all graphics tests = 0.5 x (SM2S + HDRSM3S)
GS for hardware capable of running only SM2.0 graphics tests = 0.75 x SM2S
3DMark Score = 2.5 x 1.0/(( 1.7/GS + 0.3/CPU Score )/2)
i.e. 2.5 x weighted harmonic mean of GS and CPU Score.
GT1 fps means the average frame rate measured in SM2.0 graphics test 1. CPU fps means the frame rate measured in the CPU test.

The Image Quality functionality helps taking screenshots of the tests in 3DMark06 for image quality comparison. Any frame from the benchmark tests can be selected, and that precisely same frame can be rendered on other systems for comparison, or using the DirectX reference rasterizer, for reference renderings. Take one or any number of screenshots and compare the rendering quality using your favourite Image Composer software.
Note: Some particles like smoke and explosions in the scenes may be placed a bit differently and look different. This is due to some random elements in the particle system code.
The Image quality dialog has mostly the same options as the benchmark settings dialog described above. In addition to these, there are the Frame Rendering options. These are:
Note: The DirectX 9.0c SDK (December 2005) must be installed, when using the reference rasterizer. Also note that rendering one single frame using the reference rasterizer may take up to several hours.
The image quality testing functionality is not enabled in the Basic Edition of 3DMark06.

The Texture Filtering and Anti-Aliasing test shows a 3D scene that highlights texture filtering artifacts and imperfections. You can move back and forth, and rotate the tunnel with the arrow keys. You can also change the texture filtering settings at run-time. The run-time keys are displayed, so go ahead and try different combinations of settings. Remember that your graphics hardware might not support all implemented filtering settings. This test is also useful for anti-aliasing quality testing.
Note: The Texture Filtering test goes on until you press the 'Esc' key. Please note also that some combinations of settings in this test produce a bright, flickering and rotating scene, which may not be healthy to watch.
The Texture Filtering and Anti-Aliasing test is not enabled in the Basic Edition of 3DMark06.
Graphs
The Graphs tool records per frame runtime statistics of a selected graphics tests with selected settings, and draws a MS Excel graph of the recorded data. The available settings are the same as those available in Benchmark Settings, but you can additionally select which test to run and what statistics to record. All graphics tests and CPU tests are available for collecting per frame runtime statistics. The available statistics to record for each frame are:
The Demo button in the main window opens the Demo Settings dialog. Select the resolution, anti-aliasing level, filtering mode and shader profiles you want. You can disable the sounds and enable looping, if you want the demo to run continuously. Please read more about these settings in the benchmark settings chapter.
The Basic Edition of 3DMark06 can only run the first demo part using default settings. 3DMark06 Advanced Edition will run all 4 parts, but can not loop the demo, and may not be used for commercial purposes. For example 3DMark06 Advanced Edition may not be used in computer stores or trade shows! The Professional Edition license is required for all commercial uses of 3DMark06.
The Game button in the main window opens the Game Settings dialog. Select the resolution, anti-aliasing level, filtering mode and shader profiles you want. Using any of the SM2.0 profiles, the game will use Cascaded Shadow Maps, but only with 4 rotated pointsamples / PCF filtering to smooth the shadow edges. The SM3.0 profile will also use Cascaded Shadow Maps, but with the same 16 sample kernel that is randomly rotated for each pixel as used in the HDR/SM3.0 graphics tests. You can also disable the sounds and the music. Please read more about these settings in the benchmark settings chapter.
The controls of the game are:
W: Forward ThrustWhen the turret is in the higher position, the recoil is much higher and aiming is more difficult, but the view is better.
The game time is 5 minutes, during which the player should try to shoot down as many speeders as possible. Each destroyed speeder earns the player 30 points. When the time is up, a score dialogue appears and you may submit your game score to the ORB for the Game Hall of Fame, which is posted on Futuremark's website.
The Basic Edition of 3DMark06 can not run the game.

System Info shows you the hardware setup of your PC in detail. Click the Details... button in the System frame of the main window to view your system info. The detailed System Info display requires that Internet Explorer 6 is installed.
System Info shows you details regarding your PC's:
Note: 3DMark06 runs on a wide variety of PCs, equipped with very different hardware. We have done our very best to build a system info utility which correctly detects all hardware we have been able to test it on. Still, it is possible that your PC contains for example a motherboard, which doesn't provide the CPU bus clock speed or amount of memory in the format our system info component expects. Should you find yourself in this situation, please check our FAQs for more information.
3DMark06 Professional Edition has a number of command line options. These can be used for benchmarking automation and automatic 3DMark startup after system boot. Command line options are options that are entered when 3DMark is started. The traditional way to enter command line options is to open a command prompt, and type manually the name of the executable that is to be run and the command line options for it. The examples of using the '-help' options shows two other ways to use command line options.
All available command line options are presented in a window, when you start 3DMark06 with the switch -help. This can be done in at least two ways:
Use all command line switches the same way you used the -help switch. Many command line options can be used concurrently. The command line switches are the following:
All Editions:
-help or -? - show all available command line switches.
-unregister - to unregister your 3DMark06 Professional or Advanced Edition.
-nosysteminfo - disables the system info component. Note that results without system info cannot be submitted to the Online Result Browser.
Professional Edition:
-gtall - runs all available graphics tests
-sm2all - runs both SM2.0 graphics tests
-gt1 - run SM2.0 graphics test 1 (SM2.0)
-gt2 - run SM2.0 graphics test 2 (SM2.0)
-sm3all - runs both HDR/SM3.0 graphics tests
-hdr1 - run HDR/SM3.0 graphics test 1 (HDR/SM3.0)
-hdr2 - run HDR/SM3.0 graphics test 2 (HDR/SM3.0)
-cpuall - runs all CPU tests
-cpu1 - run CPU test 1
-cpu2 - run CPU test 2
-featureall - runs all feature tests
-fillrate1 - run fill rate test 1 - single texturing
-fillrate2 - run fill rate test 2 - multi-texturing
-ps - run the pixel shader test.
-vssimple - run the vertex shader test - simple
-vscomplex - run the vertex shader test - complex
-shaderparticle - run the shader particle test (SM3.0)
-perlinnoise - run the perlin noise test (SM3.0)
-batchall - run all batch size tests
-batch8 - run the batch size test with 8 triangles / batch
-batch32 - run the batch size test with 32 triangles / batch
-batch128 - run the batch size test with 128 triangles / batch
-batch512 - run the batch size test with 512 triangles / batch
-batch2048 - run the batch size test with 2048 triangles / batch
-batch32768 - run the batch size test with 32768 triangles / batch
-res=<w>x<h> - set benchmark resolution <w>x<h>. Example: -res=1280x1024 which is the default.
-filter=<x> - set texture filtering mode, where <x> can be 'optimal', 'bilinear', 'trilinear' or 'anisotropic'. Example: -filter=optimal which is the default.
-aniso=<x> - set maximum anisotropy to be used with anisotropic filtering.
-aa=<x> - set anti-aliasing mode, where <x> 'nonmaskable' for non-maskable anti-aliasing, or the sample count for multisample anti-aliasing. Example: -aa=4 for four sample anti-aliasing.
-aaq=<x> - set anti-aliasing quality
-vsprofile=<x> - set vertex shader profile, possible values for <x> are 2_0, 2_a, 3_0
-psprofile=<x> - set pixel shader profile, possible values for <x> are 2_0, 2_a, 2_b, 3_0
-fullprec - forces full precision for shader calculations.
-nohwsm - disables hardware shadow mapping optimizations.
-nopp - disables full frame post-processing.
-vshader=<x> - enable or disable forced software vertex shaders, where <x> can be 'hw' or 'sw'. Example: -vshader=sw for software forced vertex shaders. The default value is 'hw'.
-colmipmap - colors mipmaps for filtering study
-fpfiltering - to force software floating point filtering on.
-repeat=<x> - set how many times each test should be repeated, where <x> is the amount of repeats. Example: -repeat=3 . The default is to run each test once.
-fixedfps=<x> - run in fixed frame mode, where <x> is the desired frame rate
You can also put the name of a 3DMark06 result file after the switch. This will run the benchmark specified by the other options and save the results in the result file. Example: 3DMark06 myperf.3dr . This will run the default benchmark and save the results in the file myperf.3dr.
One good use of command line switches allows you to start the 3DMark06 benchmark automatically after Windows has booted up. Make a 3DMark06 shortcut with the desired command line switches. Copy this shortcut to the Windows Start-up folder. Then every time the PC is booted-up, 3DMark06 is automatically run.
The Basic and Advanced Editions of 3DMark06 can not use most command line options. The Professional Edition has all options enabled.
If you want to run a number of results on a system using different settings and test selections, this can easily be done using the batch run functionality. The batch run functionality works like standard Microsoft Windows batch files, which use the file ending '.bat'. Just write a text file with a number of 3DMark06 runs, using various settings as command line options, save that text file in the 3DMark06 installation directory, and give the file the ending '.bat'. The batch run can now be run by double clicking the .bat file. The obtained result files can be viewed with the Online ResultBrowser, with the 'Submit Saved Result' functionality of the right-click menu, or they can be viewed in Microsoft Excel, using the 'Open in Excel' functionality of the right click menu.
Example 1:
Save a text file with the following contents with the file name batchrun1.bat:
3DMark06 results.3dr
This batch run will run the default benchmark and save the results in the file 'results.3dr'
Example 2:
Save a text file with the following contents with the file name batchrun2.bat:
3DMark06 -res=640x480 -aa=4 -gt1 results1.3dr
3DMark06 -res=1024x768 -gt1 -gt2 -vsprofile=2_a -psprofile=2_a results2.3dr
This batch run will run the SM2.0 graphics test 1 in 640 x 480 resolution and with 4 sample anti-aliasing, and save the result in results1.3dr. Then it will run SM2.0 graphics tests 1 and 2 in 1024 x 768 resolution, using vertex and pixel shader profile 2_a, and save the results in the file 'results2.3dr'
The Basic and Advanced Editions of 3DMark06 can not do batch runs. The Professional license is required for batch run functionality. Please note that 3DMark06 Basic or Advanced Editions may not be used for any commercial purposes like system testing at PC assembly companies, OEM's or IHV's.
Place the mouse pointer over the 3DMark06 program window and click the right mouse button to open the right click menu. This menu has some useful functionality:
When you start 3DMark06, you will get a 'Tip of the Day' by default. These tips contain important information about 3DMark06. We recommend clicking the 'Next' button and reading through all the tips, or at least leaving the tips enabled. When the tips are enabled, you will get a new tip every time you start 3DMark06. If you have read through all tips, or find this kind of pop-ups annoying, you can disable the tips in 3DMark06 Advanced and Professional Editions. The tips can later be re-activated from the right click menu.
You can interrupt an ongoing benchmark run, demo run or any other test by pressing the 'Esc' key on your keyboard. However, this functionality does not work during test loading. Also, you will not get any scores if you interrupt the benchmark run by pressing 'Esc'.
You can take screenshots by pressing the F12 key during any of the tests and the demos. The screenshot will be saved in the 3DMark06\shots folder in .BMP format.
Note: Taking a screenshot affects your test result by a temporary performance drop. Therefore the result of the current test will be discarded, when you take a screenshot.
For more technical information about 3DMark06 please refer to the 3DMark06 Whitepaper document which can be downloaded from here.